- Culture
- SEE MORE
- classical
- general
- talk
- News
- Family
- Bürgerfunk
- pop
- Islam
- soul
- jazz
- Comedy
- humor
- wissenschaft
- opera
- baroque
- gesellschaft
- theater
- Local
- alternative
- electro
- rock
- rap
- lifestyle
- Music
- como
- RNE
- ballads
- greek
- Buddhism
- deportes
- christian
- Technology
- piano
- djs
- Dance
- dutch
- flamenco
- social
- hope
- christian rock
- academia
- afrique
- Business
- musique
- ελληνική-μουσική
- religion
- World radio
- Zarzuela
- travel
- World
- NFL
- media
- Art
- public
- Sports
- Gospel
- st.
- baptist
- Leisure
- Kids & Family
- musical
- club
- Health & Fitness
- True Crime
- Fiction
- children
- Society & Culture
- TV & Film
- gold
- kunst
- música
- gay
- Natural
- a
- francais
- bach
- economics
- kultur
- evangelical
- tech
- Opinion
- Government
- gaming
- College
- technik
- History
- Jesus
- Health
- movies
- radio
- services
- Church
- podcast
- Education
- international
- Transportation
- Other
- kids
- podcasts
- philadelphia
- Noticias
- love
- sport
- Salud
- film
- and
- 4chan
- Disco
- Stories
- fashion
- Arts
- interviews
- hardstyle
- entertainment
- humour
- medieval
- literature
- alma
- Cultura
- video
- TV
- Science
- en
Is Cast Iron Cookware Weighing You Down? We're Here to Help.

Cast iron cookware has been around for centuries, but many modern cooks are intimidated by it. How do you clean it? What can (and can't) you cook in it? Should you season it?
In this week's Please Explain, Julia Collin Davison, the executive food editor at America’s Test Kitchen and author of the forthcoming book Cook it in Cast Iron: Kitchen-Tested Recipes for the One Pan That Does It All (Cook's Country), and J. Kenji Lopez-Alt, Managing Culinary Director of Serious Eats and author of The Food Lab: Better Home Cooking Through Science, answer all your burning cast iron questions and dispel the many myths surrounding the classic cookware.
Do you have questions about cast iron cookware? Send us your questions in a comment below, or let us know on Twitter or Facebook!
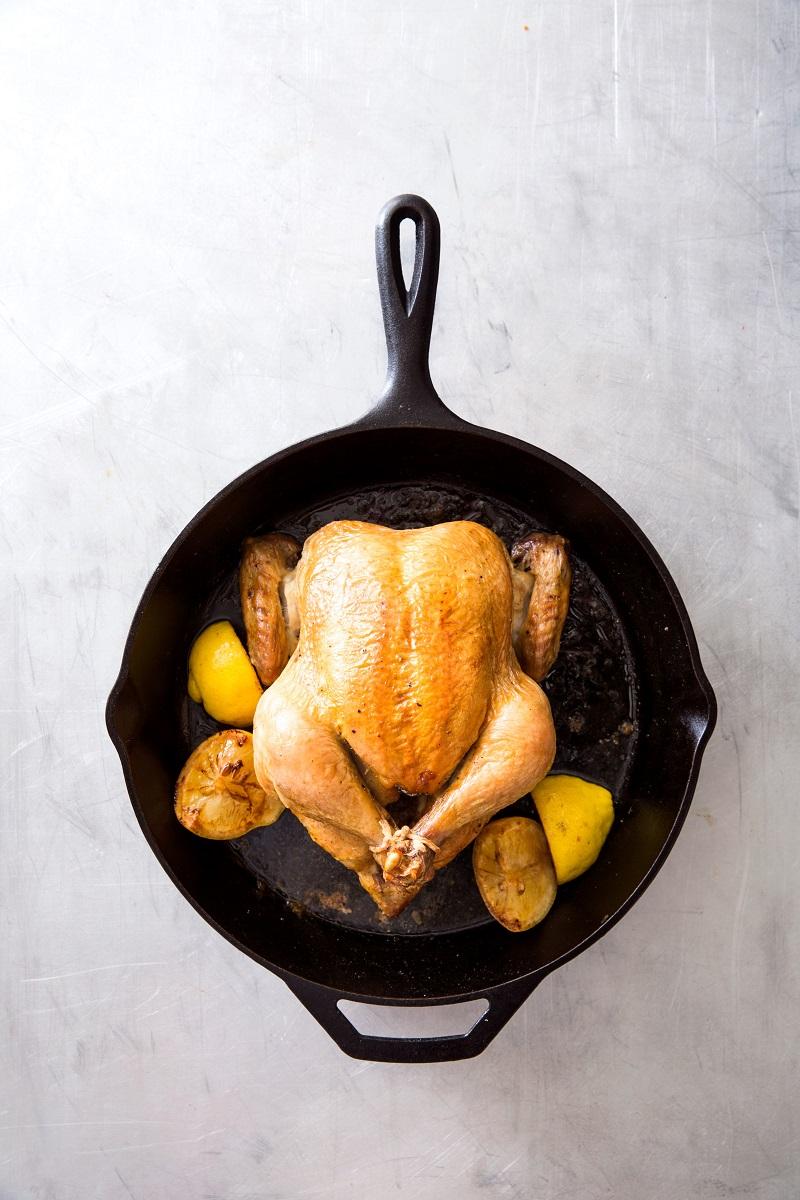
Recipe: Classic Roast Chicken with Lemon-Thyme Pan Sauce from Cook It in Cast Iron from America’s Test Kitchen
Serves 4
Why This Recipe Works: Roast chicken is often described as a simple dish, but the actual process–brining or salting, trussing, and turning–is anything but easy. We wanted a truly simple way to get roast chicken on the table in just an hour without sacrificing flavor. We quickly realized that trussing was unnecessary; we could simply tie the legs together and tuck the wings underneath the bird. We also found we could skip flipping the chicken during cooking by taking advantage of the great heat retention of cast iron. We cooked the chicken breast side up in a preheated skillet to give the thighs a head start and allow the skin to crisp up. Starting in a 450-degree oven and then turning the oven off while the chicken finished cooking slowed the evaporation of juices, ensuring moist, tender meat, even without brining or salting. A traditional pan sauce pairing lemon and thyme was the perfect complement, and it took just minutes to make while the chicken rested. Pan drippings contributed meatiness, and finishing the sauce with butter gave it the perfect velvety texture. We prefer to use a 3 1/2- to 4-pound chicken for this recipe. If roasting a larger bird, increase the time when the oven is on in step 2 to 30 to 40 minutes.
1 (3 1/2- to 4-pound) whole chicken, giblets discarded
1 tablespoon extra-virgin olive oil
Salt and pepper
1 lemon, quartered
1 shallot, minced
1 cup chicken broth
2 teaspoons Dijon mustard
2 tablespoons unsalted butter
1 1/2 teaspoons minced fresh thyme
1. Adjust oven rack to middle position, place 12-inch cast-iron skillet on rack, and heat oven to 450 degrees. Meanwhile, pat chicken dry with paper towels, rub with oil, and season with salt and pepper. Tie legs together with kitchen twine and tuck wingtips behind back.
2. When oven reaches 450 degrees, place chicken breast side up in hot skillet. Roast chicken until breast registers 120 degrees and thighs register 135 degrees, 20 to 30 minutes.
3. Arrange lemon quarters cut side down around chicken. Turn off oven and leave chicken in oven until breast registers 160 degrees and thighs register 175 degrees, 15 to 20 minutes.
4. Using potholders, remove skillet from oven. Transfer chicken to carving board, tent loosely with aluminum foil, and let rest for 15 minutes. Let roasted lemon cool slightly, then squeeze into fine-mesh strainer set over bowl, extracting as much juice and pulp as possible; press firmly on solids to yield 2 teaspoons juice.
5. While chicken rests, pour off all but 1 tablespoon fat from skillet, being careful of hot skillet handle. Add shallot and cook over medium heat until softened, about 30 seconds. Whisk in broth and mustard, scraping up any browned bits. Bring to simmer and cook until mixture is reduced to 3⁄4 cup, about 3 minutes. Stir in any accumulated chicken juices. Off heat, whisk in butter, lemon juice, and thyme. Season with pepper to taste; cover to keep warm. Carve chicken and serve with sauce.
To secure wings while roasting whole chicken and prevent them from burning, fold them firmly behind neck. They should hold themselves in place.